A garage door opener is one of the most used appliances in many homes. It provides convenient access to the garage and offers security by closing the door when you drive away. Like any frequently used mechanical device, garage door opener motors can eventually malfunction or stop working altogether. Replacing the entire garage door opener can be expensive, but repairing the motor yourself is usually an affordable and straightforward DIY project. Let’s learn how to repair garage door opener motor quickly.
Understanding the Garage Door Opener Motor
The garage door opener motor is the component that provides the power to open and close the door. It connects to a chain, belt, or screw drive that lifts the door via a trolley and rail system. Motors contain rotors, stators, magnets, brushes, bearings, and sensors that work together to operate the opener.
Motors are either AC or DC-powered. AC motors plug into a standard 120V household outlet. DC motors run on battery power and are more common in older models. When plugged in, the DC motor receives a charge from the garage door opener’s transformer.
Some common problems with garage door opener motors include:
- Burnt-out motor – This is often indicated by a humming noise but no movement when you try to operate the door. It means the motor windings have overheated and shorted out.
- Worn brushes – Brushes transfer power between the stationary and rotating parts of the motor. Worn brushes will cause reduced efficiency and intermittent operation.
- Bearing failure – Damaged or worn bearings cause scraping, squeaking noises, and resistance to turning the shaft.
- Bent trolley – If the trolley connecting the opener to the door is damaged, it adds strain to the motor.
- Obstructed track or photosensors – Impaired movement along the track or sensors blocked by dirt can overwork the motor.
Gather the Proper Tools and Materials
Before inspecting the motor and attempting repairs, gather the necessary tools and supplies:
- Set of screwdrivers – Both flathead and Philips’s heads in various sizes to remove the housing and interior screws.
- Nut drivers – To fit the various nut sizes inside the motor housing.
- Needle nose pliers – Helpful for removing retaining rings and manipulating wires.
- Voltmeter – Used to check motor winding resistances.
- Ohmmeter – Also used to test windings and identify shorts.
- Electrical tape – To temporarily hold windings when testing resistances.
- WD-40 – Lubricates stuck rotors and bearings.
- Rags – For cleaning dirt and grease from motor parts.
- Brush replacement kit – Comes with new brushes, springs, and retainers compatible with your opener model.
- Bearing kit – Contains ball bearings, grease, and sleeve bushings to rebuild worn bearings.
Other supplies like steel wool, emery cloth, lithium grease, and a low-voltage light bulb may be needed for repairs. Refer to your specific opener’s part diagrams to determine the required replacement parts.
Disconnecting Power to the Garage Door Opener
Before doing any work on the motor, you must disconnect the power to avoid electric shock. There are a few ways to do this:
- Unplug the opener from the outlet. However, some models are hardwired into the garage’s electrical system.
- Turn off the circuit breaker controlling the opener or garage outlets.
- Some openers have a release cord that disconnects the trolley from the rail. Pull this cord to detach the trolley and manually close the door.
- The emergency release handle disconnects the door from the opener drive shaft. The handle is typically red and hangs from the opener arm.
With a power cut, manually raise or lower the door halfway to access the motor housing. Never work on the door opener with the door fully open or closed. Putting tension on the chain or belt can cause injury if power is suddenly restored.
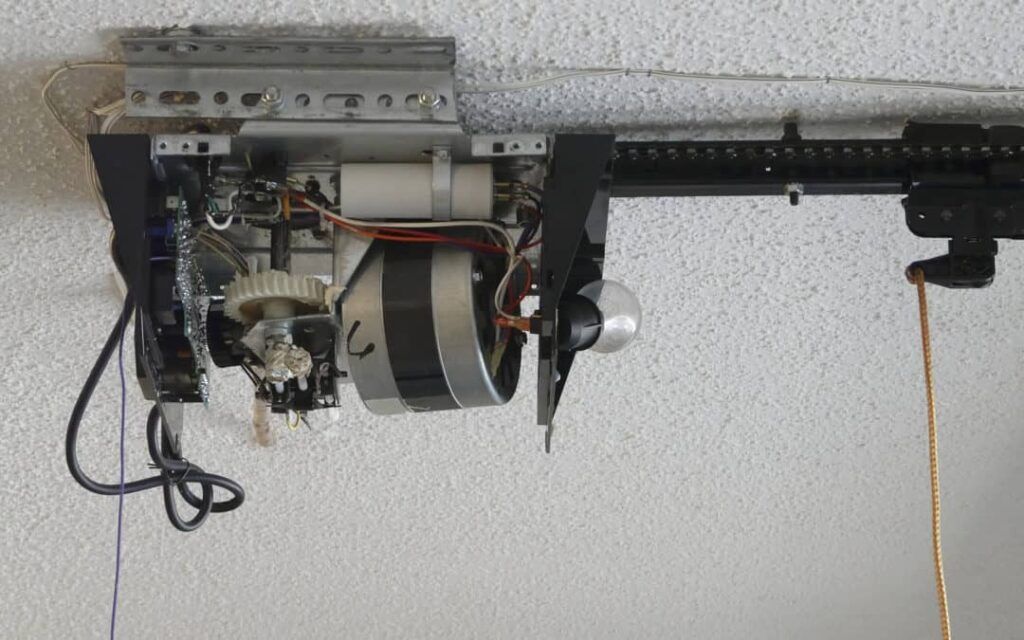
Removing the Motor Cover
Inspect the exterior of the motor for signs of damage before opening the case. Surface rust, dents, or cracked housing could indicate more significant issues. The cover is held in place by several nuts or screws around the perimeter. Use a nut driver or screwdriver to remove them and detach the cover.
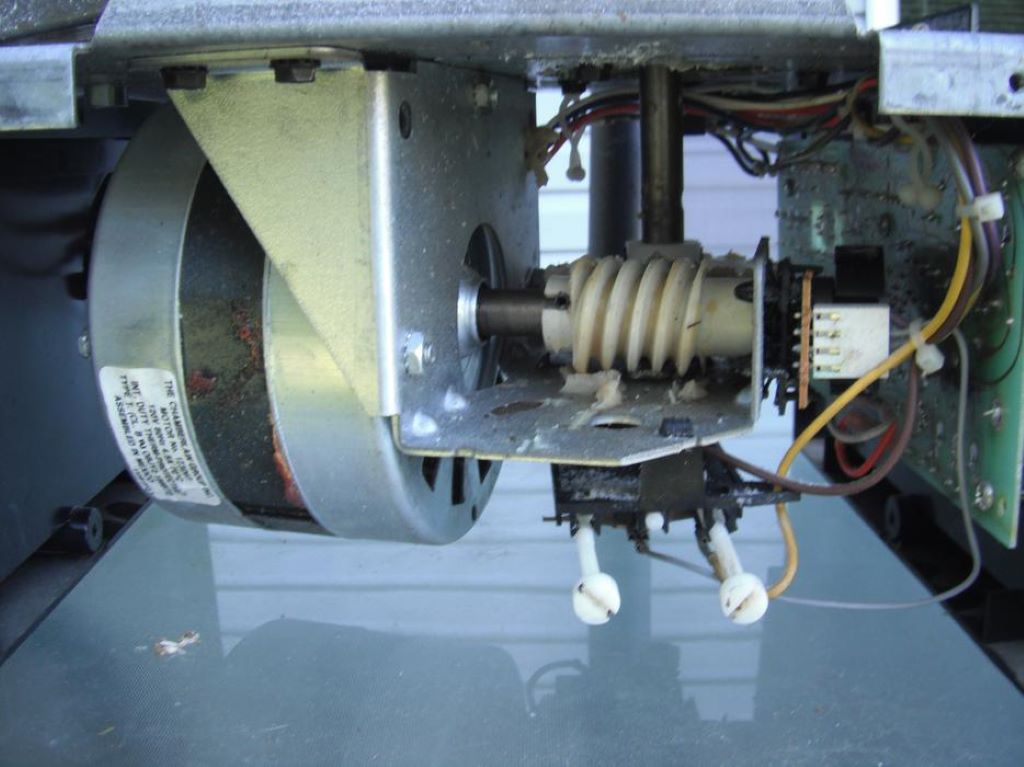
The motor is now exposed. Compare the internal components to manufacturer diagrams to identify the motor model. Belt drive openers have pulleys, while chain drive motors use sprockets. Note the wiring colors and terminal positions to ensure proper reassembly.
Testing the Motor Windings
The windings inside the motor create electromagnetic fields that drive rotation. To test windings:
- Remove the brushes to prevent false readings. Brush wires can stay connected.
- Attach one voltmeter probe to each of the two colored motor wires or terminals.
- Write down the resistance in ohms. Repeat for other winding combinations.
- Compare readings. They should be low and similar, usually within 10% of each other. Significant differences indicate shorts.
- Infinite or OL readings mean an open winding. Very high resistance points to poor connections.
Bad windings must be replaced. Match the wire gauge and number of turns when rewinding motors. Most homeowners find rewinding challenging and choose a new motor.
Inspecting the Brushes and Bearings
After testing windings, reinsert the brushes into their holders. Check that they move freely in the slots without falling out. If brushes are noticeably worn, under 1/4″ long, replace them. Examine the commutator or slip rings (on AC motors) for burned spots, rough areas, or dirt buildup. Clean with fantastic sandpaper if needed.
Spin the motor shaft by hand to feel for grinding, scraping, or resistance that indicates worn bearings. Look for discolored grease leaking from seals. Any rough rotation means the bearings should be replaced.
Reassembling and Installing the Motor
Once any repairs are complete, reassemble the motor housing. Refer to the disassembly notes and diagrams to ensure wires, brushes, and bearings are reinstalled correctly. Replace the cover and tighten all fasteners.
Before fully reconnecting power, use an ohmmeter to check for shorts between motor leads and the case. Turn the shaft to test for rubbing that could cause shorts. If all is well, plug in the opener temporarily and briefly operate the motor to confirm proper function.
To finish, disconnect the power again and firmly reconnect the trolley arm. Run the door through a complete cycle using the remote or wall switch. The motor should run smoothly without odd noises. If needed, lubricate bearings and adjust belt tension. With the repairs complete, your garage door opener should be operational again.
DIY Garage Opener Motor Repair Tips
Follow these tips for successfully troubleshooting and replacing garage door opener motors yourself:
- Always disconnect the power first for safety when working on openers.
- Carefully label and photograph wire connections before disassembling.
- Do resistance tests on winding pairs to identify problems before removing them.
- Make a note of wiring schematics. Windings must be adequately reinstalled.
- Ensure brushes move freely in their holders and make good contact with the commutator.
- Replace bearings, bushings, grease seals, and retaining clips in sets. Don’t mix old and new parts.
- Check that the new motor shaft matches the old one. Some custom machining may be required.
- Confirm the RPM rating on the new motor fits what the opener needs.
- After installation, adjust the belt tension to only about 1/2″ play when pressed.
- Replace worn sprockets or pulleys so they don’t prematurely damage a new motor.
With patience and following garage door opener motor diagrams, an experienced DIYer can successfully troubleshoot issues and replace bad motors. Just take precautions, work carefully, and double-check all wiring.
Frequently Asked Questions
1. Why does my garage door opener hum but not run?
A humming noise but no movement usually indicates a bad motor capacitor. The capacitor supplies extra torque to start the motor. If it fails, the opener hums, but the motor does not turn. Replace the capacitor to resolve this.
2. How can I tell if my garage door opener motor is burned?
When tested, signs of a burned-out motor include a loud humming noise with no motion, a burning odor, and noticeably hot windings. You can confirm windings are bad using resistance tests that show short or significantly high ohm readings.
3. What causes the garage door opener motor to get hot?
Friction in worn bearings, old brittle brushes, obstructed tracks, accumulated dirt, and broken gears can all cause excess strain on the motor. The extra effort to turn creates heat that can damage windings over time.
4. How much does it cost to repair garage door opener motor?
The cost to repair an opener motor varies by the specific work needed. Replacing brushes or bearings costs $50-100 in parts. Rewinding burnt windings averages $200-300. Installing a new motor and related parts runs $300-500.
5. Can I troubleshoot a garage door opener motor myself?
With proper precautions, you can safely inspect an opener motor, perform repairs like replacing brushes and bearings, and test windings for continuity. But rewinding motors requires special tools and skills. You may need a professional for that work if windings are damaged.
Conclusion
Garage door opener motors eventually wear out and require repair. But with some mechanical ability, essential tools, and following precautions, homeowners can often troubleshoot problems and fix issues like worn brushes and bearings. For more complex repairs, like burnt-out windings, professional help may be needed. If you’re wondering why your garage door jerks when opening and closing, it’s a sign that repairs might be needed—regular maintenance can maximize the lifespan of your opener motor, saving you the cost and hassle of an expensive opener replacement by knowing when and how to fix common problems.