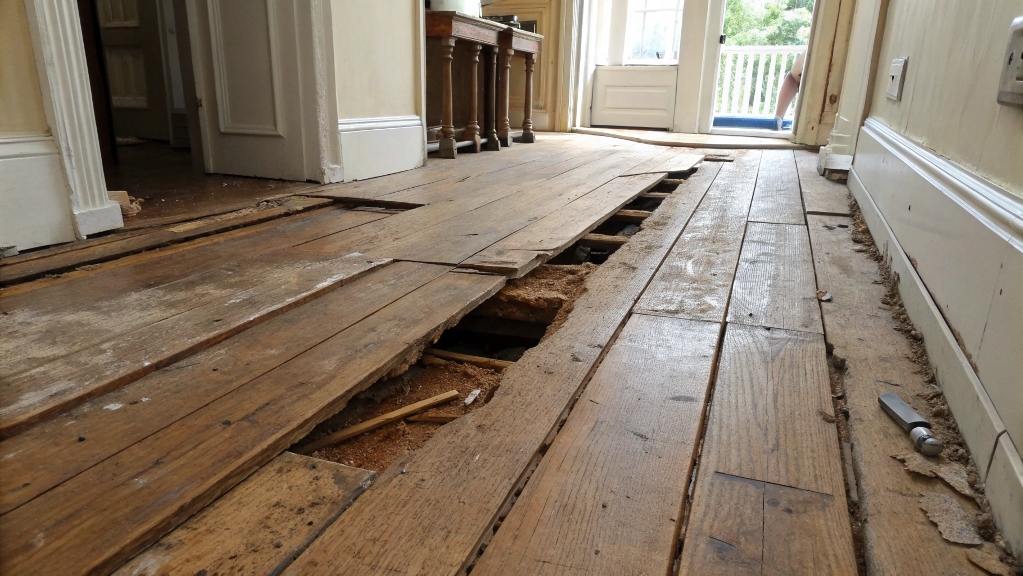
Sagging wooden floor, a common issue in older homes, compromise structural integrity, aesthetics, and safety. This comprehensive guide explores the history, modern techniques, key concepts, benefits, challenges, and future trends in fixing sagging wooden floors. With detailed steps, practical tips, real-life experiences, and FAQs, this article equips homeowners and professionals with the knowledge to restore floors effectively.
History of Wooden Floor Construction and Sagging Issues
Evolution of Wooden Flooring
Wooden floors have been a staple in homes for centuries, valued for their durability and warmth.
-
Pre-19th Century: Early homes used hand-hewn timber beams and wide plank floors, often supported by rudimentary joists.
-
Limited engineering led to uneven load distribution.
-
Natural settling caused sagging over decades.
-
-
Industrial Era: The 1800s introduced milled lumber and standardized joist systems.
-
Improved joinery reduced immediate sagging but not long-term issues.
-
Moisture and pest damage became prevalent concerns.
-
-
20th Century: Engineered wood and plywood subfloors enhanced stability.
-
Modern adhesives and fasteners minimized movement.
-
Yet, aging homes still face sagging due to wear and environmental factors.
-
Historical Repair Methods
Early repairs were labor-intensive and varied by region.
-
Shimming: Inserting wooden wedges under joists to level floors.
-
Temporary fix; shims often loosened over time.
-
-
Sistering: Attaching new boards to weakened joists.
-
Effective but required significant access to subfloor.
-
-
Jack Posts: Early use of mechanical jacks to lift sagging areas.
-
Risked over-lifting, causing cracks in walls or floors.
-
Current State of Sagging Floor Repairs
Common Causes of Sagging
Understanding why floors sag is critical for effective repairs.
-
Structural Weakness:
-
Undersized or spaced-out joists unable to bear loads.
-
Cracked or rotted joists from moisture or pests.
-
-
Foundation Issues:
-
Settling or shifting foundations causing uneven support.
-
Poor drainage leading to soil erosion under footings.
-
-
Environmental Factors:
-
Humidity causing wood expansion and contraction.
-
Termite or fungal damage weakening wood fibers.
-
Modern Repair Techniques
Today’s methods combine engineering precision with durable materials.
-
Adjustable Steel Columns:
-
Replace temporary jacks with permanent, adjustable supports.
-
Installed in crawlspaces or basements for precise leveling.
-
-
Engineered Joist Reinforcement:
-
Laminated veneer lumber (LVL) or steel plates sistered to joists.
-
Increases load capacity without replacing original wood.
-
-
Polyurethane Foam Injection:
-
Expands under subfloor to fill voids and lift sagging areas.
-
Minimally invasive but less effective for severe structural issues.
-
-
Foundation Stabilization:
-
Helical piers or push piers to restore foundation integrity.
-
Addresses root cause of sagging in severe cases.
-
|
Repair Method |
Cost (Per Sq. Ft.) |
Durability |
Invasiveness |
Best For |
|---|---|---|---|---|
|
Adjustable Steel Columns |
$10–$20 |
High |
Moderate |
Crawlspace-accessible homes |
|
Joist Sistering (LVL/Steel) |
$15–$30 |
Very High |
High |
Severe joist damage |
|
Polyurethane Foam Injection |
$5–$15 |
Moderate |
Low |
Minor sagging, no structural issues |
|
Foundation Piers |
$50–$100 |
Very High |
Very High |
Foundation-related sagging |
Key Concepts in Fixing Sagging Wooden Floors
Load Distribution
Proper load distribution prevents future sagging.
-
Joist Spacing: Standard spacing (16 inches on-center) supports typical residential loads.
-
Wider spacing requires larger joists or additional supports.
-
-
Bridging/Blocking: Cross-bracing between joists enhances stability.
-
Solid wood or metal bridging reduces joist twisting.
-
Material Selection
Choosing the right materials ensures longevity.
-
Treated Lumber: Resists moisture and pests in crawlspaces.
-
Pressure-treated pine or cedar for sistering joists.
-
-
Steel Components: Non-corrosive supports for permanent fixes.
-
Galvanized steel columns or plates for high-load areas.
-
-
Adhesives and Fasteners: Structural adhesives and lag bolts secure reinforcements.
-
Epoxy-based glues for wood-to-wood bonding.
-
Safety Considerations
Repairs involve risks that require mitigation.
-
Structural Assessment: Engage a structural engineer for severe cases.
-
Ensures repairs address underlying issues without causing new damage.
-
-
Personal Protective Equipment (PPE): Dust masks, gloves, and safety glasses for crawlspace work.
-
Protects against mold, asbestos, or sharp debris.
-
-
Temporary Supports: Use hydraulic jacks cautiously to avoid over-lifting.
-
Gradual lifting (1/8 inch per day) prevents cracking.
-
Step-by-Step Guide to Fixing a Sagging Wooden Floor
Step 1: Diagnose the Problem
Accurate diagnosis informs the repair strategy.
-
Visual Inspection:
-
Check for uneven floors using a level or marble test.
-
Look for cracks in walls or sticking doors, indicating structural shifts.
-
-
Crawlspace/Basement Access:
-
Inspect joists, beams, and foundation for damage.
-
Use a moisture meter to detect rot or fungal growth.
-
-
Professional Consultation:
-
Hire a structural engineer for complex cases.
-
Obtain permits if required by local codes.
-
Step 2: Plan the Repair
A detailed plan minimizes errors and costs.
-
Map the Sagging Area:
-
Measure the extent and severity of sagging.
-
Identify load-bearing walls affecting joist performance.
-
-
Select the Method:
-
Minor sagging: Shimming or foam injection.
-
Moderate sagging: Sistering or steel columns.
-
Severe sagging: Foundation piers or full joist replacement.
-
-
Gather Materials and Tools:
-
Hydraulic jacks, steel columns, LVL boards, or piers.
-
Power tools (drill, saw), levels, and measuring tape.
-
Step 3: Execute the Repair
Follow a methodical approach for lasting results.
-
Stabilize the Floor:
-
Install temporary supports (jacks or posts) under sagging areas.
-
Lift gradually to avoid damaging walls or flooring.
-
-
Reinforce Joists:
-
Sister damaged joists with LVL or steel plates.
-
Secure with structural adhesive and bolts for maximum strength.
-
-
Install Permanent Supports:
-
Place adjustable steel columns on concrete footings.
-
Ensure columns are plumb and securely fastened.
-
-
Address Foundation Issues:
-
Install piers if foundation settlement is detected.
-
Consult a foundation specialist for proper installation.
-
Step 4: Finishing and Testing
Ensure the repair is complete and functional.
-
Remove Temporary Supports:
-
Gradually lower jacks after permanent supports are in place.
-
Monitor for any movement or settling.
-
-
Level the Floor:
-
Use a laser level to confirm evenness.
-
Sand or plane high spots if necessary.
-
-
Restore Flooring:
-
Replace damaged floorboards or refinished surfaces.
-
Match original wood for aesthetic consistency.
-
Benefits of Fixing a Sagging Wooden Floor
Structural Integrity
Repairs restore the home’s stability.
-
Prevents further damage to walls, ceilings, and foundations.
-
Enhances load-bearing capacity for heavy furniture or foot traffic.
Aesthetic Improvement
Level floors enhance visual appeal.
-
Eliminates unsightly slopes or dips.
-
Improves resale value by addressing a common buyer concern.
Safety and Comfort
A stable floor reduces hazards.
-
Minimizes tripping risks from uneven surfaces.
-
Eliminates creaking or bouncing underfoot.
Challenges in Fixing Sagging Floors
Access Limitations
Crawlspaces or basements may be cramped or hazardous.
-
Solution: Use low-profile jacks or hire professionals with specialized equipment.
-
Tip: Clear debris and ensure proper ventilation before starting.
Cost and Time
Repairs can be expensive and time-consuming.
-
Solution: Prioritize high-impact repairs (e.g., foundation piers) for severe cases.
-
Tip: Obtain multiple contractor quotes to balance cost and quality.
Hidden Damage
Underlying issues may not be immediately visible.
-
Solution: Conduct thorough inspections with moisture meters or thermal imaging.
-
Tip: Budget for unexpected repairs, such as pest treatment or mold remediation.
Future Trends in Floor Repair Technology
Smart Monitoring Systems
Sensors detect sagging or structural shifts in real-time.
-
Embedded devices in joists or foundations alert homeowners to issues.
-
Reduces repair costs by addressing problems early.
Advanced Materials
New materials enhance durability and ease of installation.
-
Carbon fiber straps for joist reinforcement: lightweight and corrosion-resistant.
-
Self-healing concrete for foundation repairs: seals cracks autonomously.
Robotics and Automation
Robotic systems improve precision in tight spaces.
-
Crawlspace robots for inspections and minor repairs.
-
Automated jacking systems for consistent, safe lifting.
Real-Life Experience: A Case Study
In 2023, a homeowner in a 1920s Craftsman bungalow noticed a 2-inch sag in their living room floor. Initial inspection revealed rotted joists due to poor crawlspace ventilation. The repair process involved:
-
Diagnosis: A structural engineer confirmed joist damage and minor foundation settling.
-
Repair: Sistering LVL beams to damaged joists and installing two adjustable steel columns.
-
Outcome: The floor was leveled within a week, with costs totaling $8,000. Improved ventilation prevented future issues.
-
Lesson: Early intervention and professional assessment saved the homeowner from costlier foundation repairs.
Review of Repair Methods
Adjustable steel columns and joist sistering are the most reliable for moderate to severe sagging, offering durability and precision. Polyurethane foam injection suits minor sagging but lacks long-term structural benefits. Foundation piers are essential for settlement-related issues but are costly. Combining methods (e.g., columns and sistering) often yields the best results for complex cases.
Read More Also: Why Neutral Colors Are the Timeless Choice for Home Interiors
FAQs
How can I tell if my wooden floor is sagging?
Use a level or roll a marble to detect slopes. Check for wall cracks, sticking doors, or creaking floors.
Can I fix a sagging floor myself?
Minor repairs (shimming, small sistering) are DIY-friendly with proper tools and safety measures. Severe cases require professional expertise.
How long does it take to fix a sagging floor?
Minor repairs take 1–2 days; major repairs (e.g., foundation piers) may take 1–2 weeks.
Will fixing a sagging floor increase my home’s value?
Yes, addressing structural issues improves safety and aesthetics, appealing to buyers.
How do I prevent future sagging?
Maintain crawlspace ventilation, control moisture, and inspect joists regularly for damage.
Read More Also: My dear little cabin, white and very Nordic
Conclusion
Fixing a sagging wooden floor requires a blend of historical knowledge, modern techniques, and forward-thinking solutions. By diagnosing the problem accurately, selecting appropriate repair methods, and addressing challenges proactively, homeowners can restore their floors’ stability and beauty. With emerging technologies like smart sensors and advanced materials, the future of floor repairs promises greater efficiency and durability. Whether tackling a minor dip or a major structural issue, this guide provides the tools and insights to achieve lasting results.