
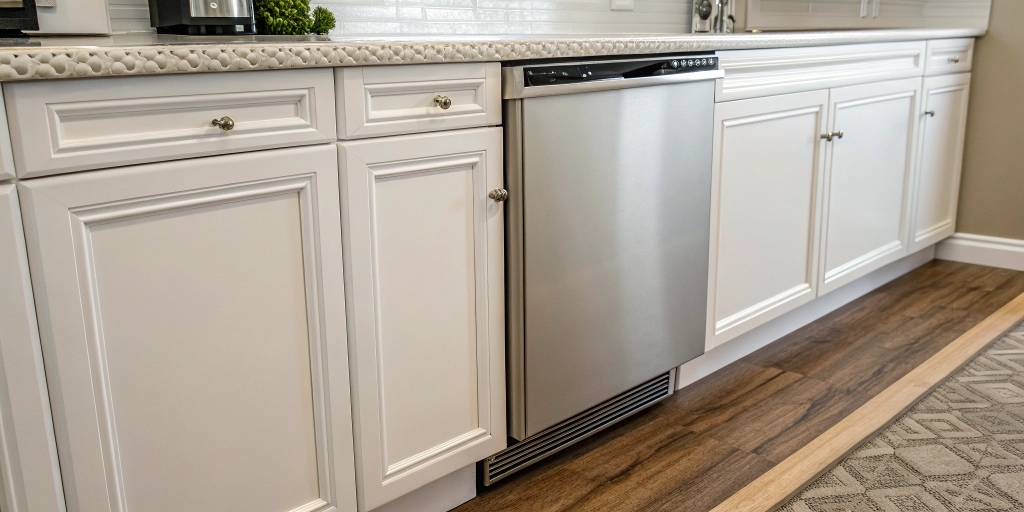
Picture this: you’ve just finished your dream kitchen renovation, complete with stunning cabinetry and gleaming appliances. But there’s one glaring issue that ruins the entire aesthetic – an awkward gap between your dishwasher and cabinet that seems to mock your otherwise perfect kitchen design. This visible gap is a real eyesore that affects millions of homeowners, but the good news is that achieving that sleek, built-in look is entirely possible with the right approach and a perfect solution for every situation.
Why Kitchen Gaps Happen and Why They Matter
Before diving into solutions, it’s crucial to understand why these gaps occur in the first place. Standard dishwashers typically measure 24 inches wide, while the width of the opening in kitchen cabinetry can vary due to construction tolerances, variations in wall straightness, or measurement errors during installation. Even a quarter-inch gap can become a significant visual disturbance and functional problem.
These visible gaps aren’t just aesthetic issues – they create practical problems too. Food particles, grease, and moisture can accumulate in these spaces, leading to unpleasant odors, pest attraction, and potential water damage to your kitchen flooring or cabinet structure. Additionally, future gaps can make your kitchen appear unfinished and reduce your home’s overall value, preventing you from achieving that polished finish modern kitchens deserve.
Essential Tools and Materials You’ll Need
Before starting any gap-filling project, gather these essential supplies. Having these tips in mind will ensure you’re prepared for a professional installation:
Basic Tools:
· Tape measure for precise measurements
· Utility knife or fine-tooth saw
· Sandpaper (120 and 220 grit)
· Caulk gun
· Putty knife or smoothing tool
· Level for cabinetry alignment
· Pencil for marking
Materials (varies by method):
· Cabinet filler strips
· Cabinet-grade wood planks for custom panel extensions
· Weather stripping for temporary solutions
· Heat resistant food grade silicone caulk
· Wood glue or construction adhesive
· Masking tape
· Cleaning supplies
· Trim pieces or molding to match your molding style
Method 1: Professional Cabinet Filler Strip Installation
Cabinet filler strips represent the most popular permanent solution among professional cabinet installers. These thin pieces of wood or composite material create a seamless transition between your dishwasher and adjacent cabinetry, delivering that perfect fit modern kitchens demand.
Step-by-Step Filler Strip Installation
Step 1: Precise Measurement and Assessment. Use your tape measure to determine the exact width of the opening at multiple points – top, middle, and bottom. Check appliance positioning and note any variations in wall straightness, as gaps can vary due to uneven floors or walls. Always take the widest measurement and add 1/8 inch for trimming flexibility.
Step 2: Material Selection for Cohesive Space. Choose cabinet filler strips that match your existing cabinetry perfectly. Solid wood strips work best for painted cabinets, while veneer-matched strips are ideal for stained cabinetry. Many cabinet manufacturers offer matching filler strips, ensuring perfect color and grain coordination that maintains your cohesive space.
Step 3: Cutting and Fitting Mark your measurements on the filler strip and cut slowly with a fine-tooth saw. Test-fit the strip, making small adjustments until it achieves that perfect fit. The strip should slide in with gentle pressure but not fall out on its own – this balance is crucial for professional results.
Step 4: Securing the Strip Apply a thin line of wood glue to one edge of the strip and carefully position it in the gap. Use painter’s tape to hold it in place while the adhesive cures. For permanent installation, you can add small finish nails from inside the cabinet using mounting instructions that ensure they don’t penetrate through to the visible surface.
Pros and Cons of Filler Strips
Advantages:
· Delivers a polished finish
· Reversible if needed
· Matches cabinet materials perfectly
· Easy, cost-effective solution
Disadvantages:
· Requires precise measuring and cutting
· May need professional installation for complex gaps
· Can be challenging with textured cabinet finishes
Method 2: Custom Panel Extensions Integration
For larger gaps or when seeking the most professional appearance, custom panel extensions offer the ultimate permanent solution. This refined approach essentially extends your cabinetry to accommodate the dishwasher perfectly, creating that seamless integration modern kitchens demand.
Creating Seamless Custom Panel Extensions
Step 1: Planning and Design Assessment Measure not only the gap width but also consider cabinet dimensions about your overall kitchen layout. Sometimes, extending the adjacent cabinet face frame creates better cabinetry alignment than simply filling the gap. Consider the dishwasher about surrounding elements.
Step 2: Material Preparation Use cabinet-grade materials that match your existing cabinetry perfectly. If your cabinets have a specific finish, you’ll need to replicate this exactly. Many homeowners find success taking a cabinet door to their local lumber yard for color matching, ensuring the counter material coordination remains intact.
Step 3: Professional Cutting Techniques Cut your wood piece approximately 1/4 inch wider than the gap measurement. This extra material allows for scribing – a technique where you mark and trim the wood to follow any irregularities in the back wall or cabinet edges perfectly.
Step 4: Finishing to Match Your Molding Style Sand the wood piece progressively from 120 to 220 grit, creating an anti-static, non-tacky top surface that resists fingerprint and smudge accumulation. Apply the same stain, paint, or finish used on your cabinets. Multiple thin coats typically provide better results than one thick application, ensuring your spotless kitchen maintains its pristine appearance.
Step 5: Installation Process Apply construction adhesive to the back of the panel and carefully position it. Use clamps or temporary braces to hold the panel while the adhesive cures. Once dry, use a router or sandpaper to blend any edges seamlessly with the existing cabinet structure, achieving that perfect solution professionals deliver.
Method 3: Advanced Caulking with Heat Resistant Materials
While caulking might seem like the simplest solution, proper technique using premium materials makes the difference between a professional result and an obvious patch job. This polished approach requires DIY ingenuity and attention to detail.
Professional-Grade Caulk Application
Step 1: Surface Preparation Clean the gap thoroughly with degreasing cleaner and allow it to dry completely. Any residue will prevent proper adhesion and lead to premature failure. This step is crucial for maintaining your spotless kitchen standards.
Step 2: Premium Caulk Selection Choose heat resistant food grade silicone for areas near appliances, or paintable acrylic caulk for painted surfaces. Avoid using bathroom caulk in kitchen applications – kitchen-grade formulations resist grease and food stains better while remaining dishwasher safe during cleaning cycles.
Step 3: Masking for Precision Apply painter’s tape along both edges of the gap, leaving only the space you want filled exposed. This step is crucial for achieving straight, professional-looking lines that complement your molding style.
Step 4: Application Technique Cut the caulk tube tip at a 45-degree angle, making the opening slightly smaller than your gap width. Apply steady pressure to the caulk gun while moving at a consistent speed. The key is maintaining constant motion to avoid thick spots or gaps.
Step 5: Tooling and Cleanup Immediately after application, use a caulk smoothing tool or your finger to create a concave profile with a non-slip base for durability. Remove the masking tape while the caulk is still wet, pulling at a 45-degree angle away from the caulk line.
Method 4: Weather Stripping and Temporary Solutions
For renters or those seeking flexible gap cover options, weather stripping and adhesive solutions offer versatility without permanent modification.
Implementing Temporary Gap Cover Systems
Weather stripping designed for appliance applications provides an excellent temporary gap cover that can be easily removed without damage. These solutions work particularly well when appliance heights vary or when you’re planning future kitchen modifications.
Application Process:
· Clean the surfaces thoroughly
· Measure and cut weather stripping to fit
· Apply with firm pressure for secure adhesion
· Ensure the material creates a fingerprint and smudge resistant barrier
This approach serves as an easy, cost-effective solution while maintaining the flexibility to make changes later.
Method 5: Advanced Kick Panel and Metal Mounting Solutions
For comprehensive coverage and professional appearance, integrating kick panel modifications with metal mounting bracket systems provides superior stability and aesthetics.
Professional Mounting Systems
Step 1: Assess Mounting Requirements. Review mounting instructions for your specific dishwasher model and evaluate how adjustable feet can be modified to improve the overall fit. Consider flooring adjustments that might affect the final positioning.
Step 2: Install Metal Mounting Bracket. Use appropriate metal mounting bracket systems that provide secure attachment while allowing for minor adjustments. These systems account for variations in wall straightness and ensure long-term stability.
Step 3: Kick Panel Integration Modify or extend kick panels to create seamless integration with your existing cabinetry. This approach goes the extra mile to ensure every visible element contributes to your cohesive space design.
Preventing Future Gaps Through Smart Planning
Professional Installation Considerations
When installing new appliances or cabinets, consider these preventive measures to avoid future gaps:
· Always verify appliance dimensions against cabinet dimensions before installation
· Account for flooring adjustments and thickness changes
· Use adjustable feet for future leveling capabilities
· Plan for appliance replacement with standard sizing in mind
· Consider variations in wall straightness during initial planning
Maintenance for Long-Term Success
Regular maintenance keeps your gap solutions looking professional and maintains that spotless kitchen appearance:
· Clean caulked areas monthly with mild detergent
· Check cabinet filler strips annually for loosening
· Touch up paint or stain as needed to maintain the polished finish
· Monitor for pest activity or moisture accumulation
· Inspect weather stripping for wear if using temporary solutions
Advanced Techniques for Modern Kitchens
Creating Mirror-Smooth Finishes
For homeowners seeking that extra level of refinement, consider these refined approaches:
Non-Slip Mirror Base Applications: When working near the kitchen counter area, ensure any gap cover solution provides a stable, non-slip mirror base that complements your counter material.
Professional Cleaning Services Integration: Design your gap solutions to work seamlessly with professional cleaning services, ensuring all materials remain accessible and maintainable.
Common Mistakes to Avoid
Installation Errors That Compromise Results
Rushing the Measurement Process: Taking quick measurements of cabinet dimensions often results in poorly fitting solutions that require costly rework.
Ignoring Appliance Heights: Failing to account for variations in appliance heights can create uneven gaps that no solution can adequately address.
Improper Surface Preparation: Skipping cleaning and preparation steps leads to poor adhesion and premature failure, undermining your investment in a permanent solution.
Over-Application of Materials: Excessive caulk or adhesive creates s messy, unprofessional appearance and attracts dirt, working against your goal of maintaining a spotless kitchen.
Cost Comparison of Different Methods
Understanding the investment required for each approach helps homeowners make informed decisions between easy, cost-effective solutions and more permanent options:
· Cabinet Filler Strips: $15-50 depending on material and length
· Custom Panel Extensions: $30-100, including finishing materials
· Professional Caulking: $10-25 for heat resistant food grade materials
· Weather Stripping Solutions: $5-20 for temporary gap cover
· Professional Installation: $100-300, depending on method complexity
When to Choose Professional Installation for Gap Hiding
While many gap-hiding methods accommodate DIY ingenuity, certain situations benefit from professional expertise:
· Gaps wider than 2 inches require structural modification
· Matching complex cabinet finishes or exotic counter material
· Integration with expensive or delicate cabinetry systems
· Situations requiring modifications to metal mounting bracket systems or adjustable feet
Professional cabinet installers have specialized tools and experience that ensure perfect results, especially for high-end modern kitchens where any imperfection stands out as a real eyesore.
Troubleshooting Common Installation Issues
Addressing Gap Size Variations
If your gap varies significantly from top to bottom due to variations in wall straightness, you’ll need to address this before applying any solution. Use shims to level the dishwasher or consider professional appliance adjustment to ensure proper cabinetry alignment.
Resolving Adhesion Problems
Poor caulk or adhesive performance usually stems from contaminated surfaces. Clean thoroughly with degreasing agents and ensure complete drying before application. This extra mile in preparation prevents future failures.
Achieving Perfect Color Coordination
For challenging color matches with your existing molding style, consider taking a cabinet door sample to professional paint stores. Computer color matching provides much more accurate results than visual estimation, ensuring your cohesive space remains intact.
Transform Your Kitchen with Professional Results
Hiding the gap between your dishwasher and cabinet doesn’t have to compromise your vision of modern kitchen perfection. Whether you choose the quick weather stripping solution, professional cabinet filler strips, or comprehensive custom panel extensions, the key is selecting the method that matches your skill level, budget, and desired outcome.
A properly executed gap solution transforms your kitchen from amateur to professional-grade, eliminating that awkward gap while increasing both enjoyment and home value. The investment in time and materials pays dividends in improved aesthetics and functionality, delivering the sleek, built-in look that defines contemporary kitchen design.
Keep these tips in mind as you evaluate your options: the perfect solution exists for every situation, budget, and skill level. From easy, cost-effective solutions using weather stripping to permanent solutions featuring custom panel extensions, each refined approach offers unique benefits that can transform your space.
Take action today – measure your gap precisely using a tape measure, assess your cabinet dimensions, and select the method that best suits your situation. With the right polished approach and attention to detail, you’ll achieve that seamless, built-in look that makes your modern kitchen truly shine, creating the cohesive space you’ve always envisioned.
Whether you embrace DIY ingenuity or seek professional installation, your spotless kitchen awaits – free from visible gaps and that real eyesore that once detracted from your beautiful cabinetry. The perfect fit is within reach, and your future self will thank you for going the extra mile to achieve professional results.
Find out more:
How to Choose the Perfect Custom Cabinets for a Modern Home Remodel


