Tile floors look stunning when they are clean. However, keeping them scratch-free while vacuuming takes more care than most people realize. The wrong vacuum or the wrong approach can leave fine marks that dull the surface over time. The good news is that with a few simple adjustments, you can protect your floors and still get them spotless every time.
This guide walks you through everything you need to know — from choosing the right equipment to building a consistent floor cleaning routine that keeps your tiles looking new for years.
Why Tile Floors Scratch So Easily
Tile may feel hard and tough underfoot, but its glazed surface is surprisingly sensitive. Tiny particles of dirt, sand, and grit act like sandpaper when dragged across the finish. Vacuum attachments with stiff bristles or hard plastic edges can do the same damage.
Ceramic and porcelain tiles are the most common types found in homes. Both have a protective glaze on top. Once that glaze is scratched, the tile loses its shine and becomes harder to clean. Therefore, how you vacuum matters just as much as how often you vacuum.
Natural stone tiles, such as marble or travertine, are even more delicate. These require extra caution because they scratch and stain more easily than ceramic options.
Choosing the Right Vacuum for Tile Floors
Not every vacuum is safe for tile. Before you even think about technique, you need the right tool.
Look for these features when selecting a vacuum for tiled surfaces:
- Soft roller brush head or a felt-lined floor attachment
- Adjustable suction settings
- Rubber wheels instead of hard plastic ones
- A setting to turn off the rotating brush bar entirely
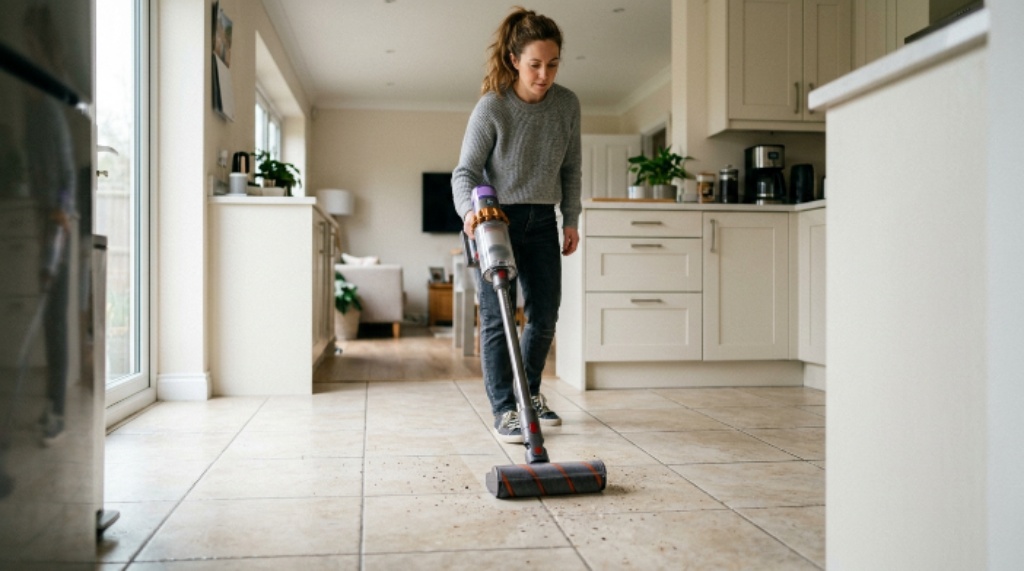
Canister vacuums are often a great choice for tile because they offer flexible attachments and gentler suction control. Stick vacuums with a hard floor mode also work well. Upright vacuums with a beater bar, however, should be used with caution. The spinning brush can grind debris into the tile surface instead of lifting it away.
Additionally, robot vacuums designed for hard floors can work nicely for daily maintenance, as long as their wheels and sensors are gentle on the tile surface.
Preparing the Floor Before You Vacuum
Preparation makes a real difference. Taking two minutes to prepare the space before you start will protect your floor and improve your results.
First, do a quick visual sweep of the area. Remove any large debris by hand, such as paper, toys, or food scraps. These items can get caught in the vacuum and scratch the floor as they are dragged across it.
Next, check for any loose grout chips or broken tile fragments. These sharp pieces can cause significant scratches if pulled under a vacuum head at speed.
Finally, move furniture carefully. Sliding chairs or tables across tile — even just a few inches — can cause surface marks. Lift items rather than drag them whenever possible.
The Correct Tile Vacuum Technique
Now comes the core of the process. Using the right tile vacuum technique is the single most important step in protecting your floors during cleaning.
Start by setting your vacuum to its hard floor or bare floor mode. This turns off or raises the rotating brush bar so it does not spin against the tile surface. If your vacuum does not have this setting, switch to a bare floor attachment instead.
Lower the suction slightly if your vacuum has adjustable power. Extremely high suction can cause the vacuum head to drag heavily across the floor, increasing the risk of scratches.
Move the vacuum in slow, steady strokes. Work in the direction of the tile lines where possible. This approach helps the suction capture debris sitting in the grout lines rather than pushing it along the surface.
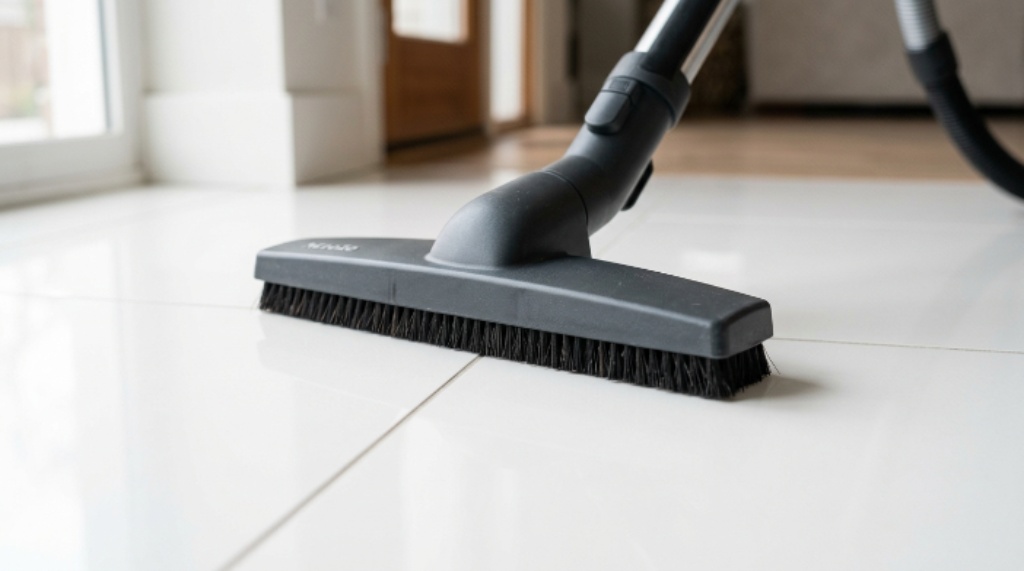
Overlap each stroke slightly. This ensures you do not miss any strips of floor between passes. Pay particular attention to edges and corners, where dirt tends to collect. Use a soft crevice tool or a brush attachment to clean these areas without pressing hard against the tile.
Avoid rushing. Quick, jerky movements stir up dust rather than collecting it. Slow, deliberate strokes give the suction time to lift particles cleanly off the surface.
Cleaning Grout Lines Without Damage
Grout is porous and collects dirt quickly. Over time, grout lines can look dark and dingy even when the tile itself is clean. Therefore, giving grout lines extra attention during your vacuuming session is worth the effort.
Use a narrow crevice tool along the grout lines during your vacuum pass. This pulls out loose debris lodged between tiles. However, do not press the attachment hard into the grout, as this can chip older or crumbling grout.
After vacuuming, a damp mop or a soft grout brush will handle the deeper cleaning that a vacuum cannot do alone.
Building a Smart Floor Cleaning Routine
Consistency is the real key to scratch-free tile floors. A regular floor cleaning routine prevents the buildup of grit and debris that causes damage in the first place.
Here is a simple schedule that works well for most households:
- Daily: Sweep or lightly vacuum high-traffic areas such as kitchens and entryways.
- Two to three times per week: Do a full vacuum pass across all tiled rooms.
- Weekly: Follow up vacuuming with a damp mop using a pH-neutral cleaner safe for tile.
- Monthly: Deep clean grout lines and inspect tiles for any chips or cracks.
Sticking to this floor cleaning routine means you never let dirt accumulate long enough to cause scratches. Additionally, light and frequent cleaning is always easier than heavy-duty scrubbing sessions that become necessary when cleaning is neglected.
Place doormats at all exterior entrances. These trap the sand and grit that people track in from outside, which is the number one source of tile scratches. Felt pads under furniture legs are another simple step that makes a significant difference over time.
Common Mistakes to Avoid
Even careful homeowners make a few classic errors when vacuuming tile. Knowing what to avoid is just as useful as knowing what to do.
Using a vacuum with a spinning brush bar on tile without switching to hard floor mode is one of the most frequent mistakes. The bristles can scratch or drag debris in ways that damage the glaze.
Vacuuming too infrequently is another problem. When debris builds up, a single vacuuming session has to deal with more grit, which increases the chances of scratches occurring during cleaning.
Ignoring the wheels of your vacuum is also worth mentioning. Over time, hair, thread, and debris wrap around the wheels and create hard edges that can mark the floor. Clean your vacuum’s wheels and brush head regularly to prevent this.
Conclusion
Vacuuming tile floors without causing scratches is entirely achievable with the right approach. Choose a vacuum designed for hard floors, use the correct tile vacuum technique with slow and steady strokes, and turn off any rotating brush bars before you start. Prepare the area beforehand by removing large debris and checking for sharp fragments. Build a regular floor cleaning routine that includes daily sweeping, frequent vacuuming, and weekly mopping. These steps, combined consistently, will keep your tiles gleaming and scratch-free for years to come. Small habits make a big difference, and your floors are well worth the effort.
Frequently Asked Questions
Can I use any vacuum on tile floors?
Not all vacuums are safe for tile. You should use a vacuum with a soft roller head, rubber wheels, and a hard floor mode that disables the spinning brush bar. Vacuums with aggressive beater bars can scratch the tile glaze.
How often should I vacuum tile floors?
For best results, vacuum high-traffic areas daily and all tiled rooms two to three times per week. Following a regular floor cleaning routine prevents grit buildup and reduces the risk of surface scratches.
Is it better to sweep or vacuum tile floors?
Both work, but vacuuming tends to be more effective because it captures fine dust and allergens rather than just pushing them around. A vacuum with proper suction lifts debris cleanly from both the tile surface and the grout lines.
Why does my tile look dull after vacuuming?
Dull tile after vacuuming usually indicates fine scratches have accumulated on the glaze. This is often caused by using a vacuum with a hard brush bar, vacuuming with wheels clogged with debris, or allowing grit to build up between cleaning sessions.
What is the best tile vacuum technique for grout lines?
Use a narrow crevice attachment and run it slowly along each grout line with gentle pressure. Avoid pressing too hard, especially on older grout. Follow up with a damp grout brush for a deeper clean that vacuuming alone cannot achieve.
Related Topics:
How to Clean Grout Without Bleach: A Comprehensive Guide
How to Get Rid of Flying Ants in the House: Effective Tips and Smart Solutions for a Pest-Free Home