Thermal bridging in gable roofs creates serious problems for homeowners. It causes heat loss, increases energy bills, and leads to moisture issues. Understanding how to prevent thermal bridging ensures your home stays comfortable year-round while reducing utility costs.
What Is Thermal Bridging?
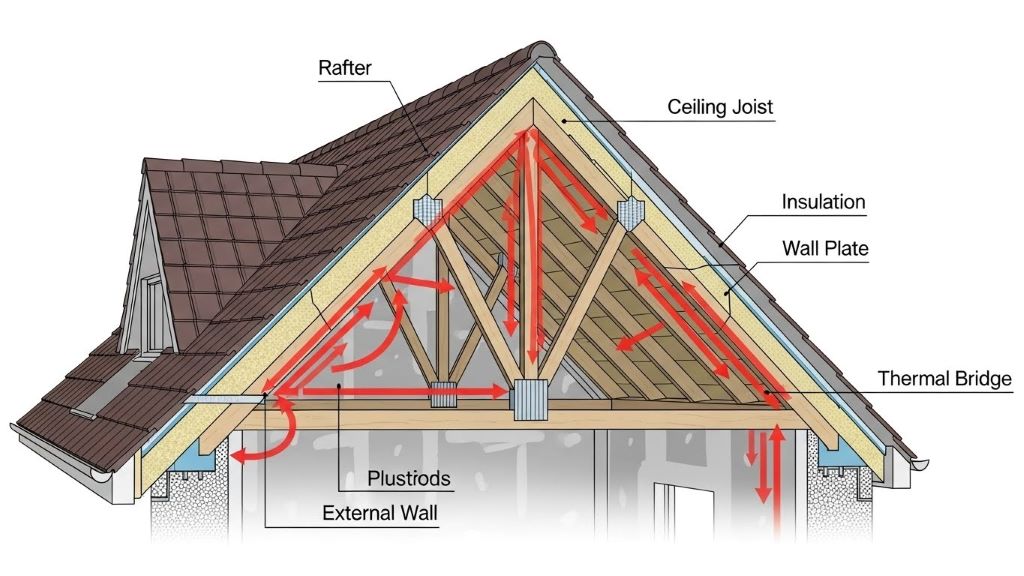
Thermal bridging occurs when heat moves through materials more easily than through surrounding insulation. In gable roofs, this happens at structural elements like rafters, studs, and ridge beams. These components conduct heat faster than insulation materials. Therefore, they create pathways for warmth to escape during winter and enter during summer.
The impact of thermal bridging extends beyond comfort. It reduces your home’s overall energy efficiency significantly. Additionally, temperature differences caused by thermal bridges can lead to condensation problems. This moisture accumulation potentially causes mold growth and structural damage over time.
Common Thermal Bridge Locations in Gable Roofs
Several areas in gable roofs are particularly vulnerable to thermal bridging. The ridge beam represents one major concern. This horizontal structural member runs along the roof’s peak and creates a continuous thermal bridge if not properly addressed.
Rafter connections also pose challenges. These sloped structural members connect the ridge to the walls. They penetrate insulation layers and create direct paths for heat transfer. Furthermore, the junction where rafters meet exterior walls forms another critical thermal bridge location.
Collar ties and ceiling joists contribute to the problem as well. These horizontal members provide structural support but interrupt insulation continuity. Each penetration through the thermal envelope becomes a potential weak point in your home’s energy performance.
Continuous Insulation Strategies
Continuous insulation provides one of the most effective solutions for preventing thermal bridging. This approach involves installing insulation layers that cover structural members completely. By doing so, you eliminate the direct heat transfer paths that thermal bridges create.
Rigid foam boards work exceptionally well for continuous insulation applications. Installing these boards over rafters creates an uninterrupted thermal barrier. The insulation extends beyond structural members and maintains consistent coverage across the entire roof assembly.
Spray foam insulation offers another excellent option. This material expands to fill gaps and cavities thoroughly. It adheres directly to surfaces and creates seamless coverage around structural elements. However, professional installation ensures proper application and maximum effectiveness.
External Insulation Methods
External insulation systems provide superior thermal performance for gable roofs. These methods involve placing insulation on the outside of the roof structure. Consequently, structural members remain within the warm envelope of your home.
Installing rigid insulation boards above the roof sheathing represents a common external approach. This technique keeps rafters and other framing warm during winter months. The insulation sits between the sheathing and roofing material, creating an effective thermal barrier.
Additionally, external insulation simplifies installation compared to working between rafters. It allows for thicker insulation layers without reducing interior ceiling height. This flexibility enables homeowners to achieve higher R-values and better overall performance. According to the U.S. Department of Energy, proper insulation can reduce heating and cooling costs by up to 20 percent.
Thermal Break Products and Materials
Specialized thermal break products help interrupt heat flow through structural connections. These materials feature low thermal conductivity and fit between structural elements. They effectively reduce heat transfer while maintaining structural integrity.
Proprietary thermal break clips and brackets support rafters while minimizing thermal bridging. These engineered products use materials like fiberglass or composite plastics. They provide necessary structural support without creating significant heat loss pathways.
Insulated structural panels represent another innovative solution. These panels combine insulation with structural framing in a single unit. They eliminate many traditional thermal bridges by integrating support and insulation seamlessly.

Proper Installation Techniques
Correct installation makes the difference between adequate and excellent thermal performance. Careful attention to detail during construction prevents common mistakes that compromise thermal bridging prevention.
Starting with proper planning ensures all team members understand thermal bridging concerns. Creating detailed drawings that show insulation placement helps prevent gaps and compression. Additionally, scheduling inspections at critical stages catches problems before they become permanent.
Avoiding insulation compression remains crucial throughout installation. Compressed insulation loses effectiveness dramatically. Therefore, ensure adequate space exists for insulation to maintain its full thickness around structural members.
Sealing all gaps and joints prevents air leakage that amplifies thermal bridging effects. Using appropriate sealants and tapes creates airtight connections between materials. This attention to air sealing complements insulation efforts significantly.
Advanced Framing Techniques
Advanced framing methods reduce the amount of lumber in roof assemblies. Less wood means fewer thermal bridges and more space for insulation. These techniques optimize structural efficiency while improving thermal performance.
Raised heel trusses allow full-depth insulation at the roof’s edge. Traditional construction often compresses insulation near eaves, creating thermal bridges. However, raised heels eliminate this problem by providing adequate space for insulation.
Optimized rafter spacing represents another advanced technique. Placing rafters 24 inches on center instead of 16 inches reduces wood volume significantly. This change decreases thermal bridging while maintaining necessary structural support for most residential applications.
Monitoring and Verification
Thermal imaging cameras help identify thermal bridges after construction. These devices reveal temperature differences across surfaces visually. They pinpoint problem areas that need additional attention or remediation.
Blower door tests measure air leakage throughout the building envelope. Combined with thermal imaging, these tests provide comprehensive performance data. They verify that thermal bridging prevention measures work as intended.
Regular inspections catch developing issues early. Settling, moisture damage, or aging materials can create new thermal bridges over time. Therefore, periodic assessments ensure your gable roof continues performing optimally for years.
Cost Considerations and Return on Investment
Preventing thermal bridging requires upfront investment in materials and labor. However, the long-term savings justify these initial costs. Reduced energy bills accumulate significant savings over your home’s lifetime.
Continuous insulation and external systems cost more than basic insulation methods. Nevertheless, they deliver superior performance that translates to lower heating and cooling expenses. Additionally, improved comfort and reduced condensation risks add value beyond simple energy savings.
Many regions offer incentives and rebates for energy-efficient construction. These programs reduce the net cost of thermal bridging prevention measures. According to ENERGY STAR, homeowners can access various incentive programs that make energy improvements more affordable. Researching available options in your area makes prevention strategies more financially accessible.
Conclusion
Preventing thermal bridging in gable roofs protects your investment and enhances comfort. By understanding where thermal bridges occur and implementing effective prevention strategies, you create a more energy-efficient home. Continuous insulation, external methods, and proper installation techniques all contribute to success. The initial investment pays dividends through lower energy bills, improved comfort, and reduced moisture problems. Taking action now ensures your gable roof performs optimally for decades to come.
Frequently Asked Questions
What is the most cost-effective way to prevent thermal bridging in an existing gable roof?
Adding continuous rigid foam insulation over existing roof sheathing during a re-roofing project offers the best value. This approach addresses thermal bridging without requiring complete roof reconstruction. It provides significant performance improvements while leveraging necessary maintenance work.
How much does thermal bridging increase heating costs?
Thermal bridging can increase heating costs by 20 to 30 percent in poorly insulated roofs. The exact impact depends on climate, structural design, and existing insulation levels. Preventing thermal bridges delivers proportional savings on energy bills throughout the year.
Can I prevent thermal bridging without removing my existing roof?
Yes, you can add insulation from the interior by using spray foam or installing continuous insulation below rafters. While exterior methods work better, interior approaches still provide meaningful improvements. They represent viable options when roof replacement is not immediately planned.
Does thermal bridging affect summer cooling costs too?
Absolutely, thermal bridges allow heat to enter your home during summer months just as they let warmth escape in winter. This increases air conditioning loads and cooling expenses. Preventing thermal bridging improves year-round comfort and reduces both heating and cooling costs significantly.
What R-value should I target for gable roof insulation?
Recommended R-values vary by climate zone, ranging from R-30 to R-60 for cold climates. Consult local building codes for minimum requirements in your area. However, exceeding minimum standards typically provides better long-term value through enhanced energy savings and comfort.
Related Topics:
Crown Your Home Green: Unveiling the Most Environment Friendly Roofing Options